Voice to Text for Mac: Setup, Tips, and Better Dictation

You're halfway through an email when the thought arrives faster than your fingers can type it. You open a Slack reply, switch to Notes, lose the sentence, and then spend more time fixing punctuation and names than typing would have taken. That is the real test of voice to text for Mac. A clean demo matters less than what happens when you dictate across everyday apps, use technical terms, change languages, or say things that shouldn't leave your computer.
macOS Dictation is a good baseline because it's built into the operating system and available in text fields across apps. Apple introduced system-wide Dictation in OS X Mountain Lion in 2012, and since then Mac users have expected speech input to be native rather than an accessibility add-on. The work is in the configuration. Shortcut, microphone placement, language, chip generation, privacy toggles, and app behavior all decide whether dictation ends up faster than typing.
Table of contents
- Enabling Dictation on your Mac
- Understanding Mac Dictation privacy settings
- Improving Dictation accuracy and speed
- When built-in Dictation falls short
- App-specific Dictation tips for macOS
- Your Mac Dictation checklist
Enabling Dictation on your Mac
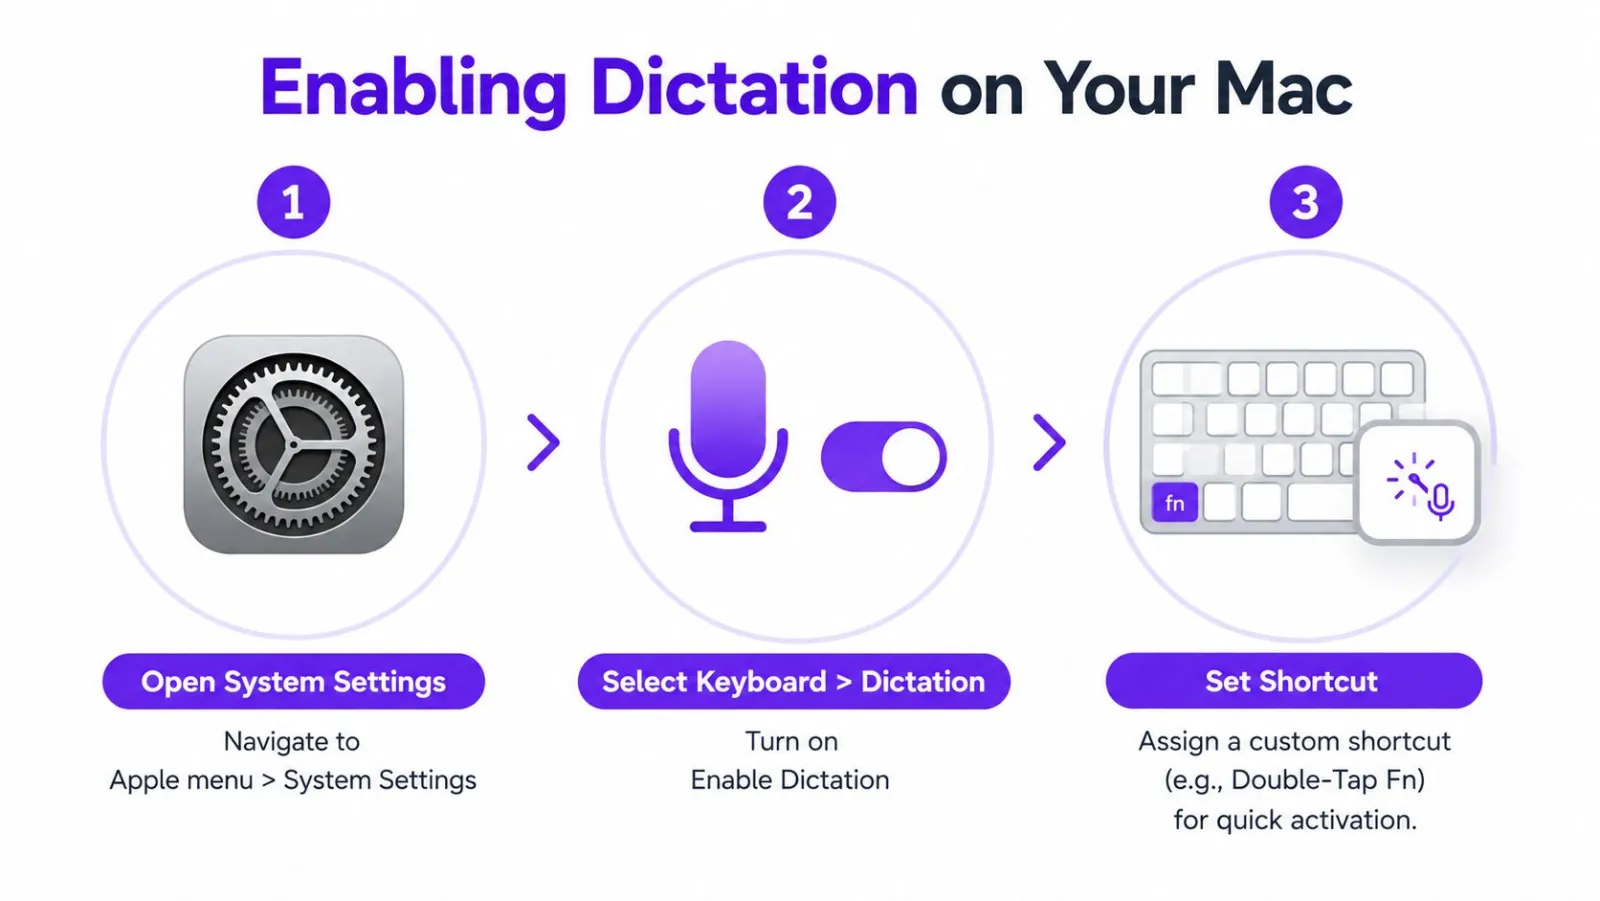
Open the Apple menu, choose System Settings, select Keyboard, then scroll to Dictation. Turn on Enable Dictation. macOS may ask you to pick a language and confirm microphone permissions. Once it's on, open the shortcut menu and pick a trigger that suits your hands rather than accepting the default.
Choose a shortcut you'll actually use
The default double-press of the Fn key works, but it feels awkward when you're moving between keyboard and mouse. In the Dictation settings, open the shortcut menu and pick another option, or set a custom key combination. A shortcut that doesn't clash with your editor, browser, or accessibility tools is worth more than one that looks convenient on paper.
I prefer a deliberate trigger that's easy to hit without looking down. A custom shortcut also cuts accidental activation when you're using function keys for brightness, media, or app commands. Test it in TextEdit first, then in the apps you write in most.
Configure languages before you dictate
In the Dictation settings, choose the language and region that match how you speak, not only the language you write in. Apple lists the supported macOS Dictation languages, including Arabic, Cantonese, Catalan, Croatian, and Danish, in its Mac Dictation language documentation.
If you have more than one language configured, macOS lets you switch mid-dictation by clicking the current language indicator. Apple's macOS feature availability page shows that support varies by country and region, with locales such as Arabic for Saudi Arabia and the United Arab Emirates, Cantonese for Hong Kong and mainland China, Danish for Denmark, and Spanish for Chile.
Practical rule: set the correct region before troubleshooting accuracy. A language mismatch can look like a microphone problem when the real issue is recognition context.
Click into a text field, hit your new shortcut, and say a short test sentence with punctuation, a proper name, and a line break. That exposes configuration problems before they interrupt real work.
Understanding Mac Dictation privacy settings
The privacy answer isn't "Mac Dictation is private." Processing depends on the Mac's hardware, language, connection, and settings. Apple's support documentation says Dictation can involve sharing audio recordings depending on configuration, and you can turn Improve Siri & Dictation on or off.
Apple silicon Macs and Intel Macs are not the same privacy environment. On-device processing is available on Apple silicon, while older Intel Macs may use different processing paths depending on whether enhanced on-device resources are available and which settings are on. Check the controls on the specific Mac instead of assuming a built-in feature follows one rule everywhere.
Apple's documentation says audio interactions connected to Dictation can be tied to a random identifier and kept for under six months on the device, and related request data may be kept for up to two years to improve Siri, Dictation, Search, and other language features. That isn't the same as saying every recording is stored for the whole period. It does show that the question to ask is what data is collected under your settings and processing path.
Verify the settings before sensitive dictation
For healthcare, legal, financial, or enterprise work, review System Settings, Keyboard, and Dictation before speaking confidential material. Confirm the selected language, check the Improve Siri & Dictation setting, and find out whether your organization has device-management requirements on top. "Built-in" and "free" are not a substitute for a documented privacy review.
Apple's Dictation support guidance is the right place to confirm the controls available for your Mac and language. For a broader look at why built-in voice features raise configuration-specific privacy questions, see voice privacy risks in built-in apps.
Apple also measures speech usage per app through its Automatic Speech Recognition Usage report, which counts Dictation or Siri requests per application, with history starting in iOS 17.4 and iPadOS 17.4. That doesn't tell you what your Mac stores in a given session, but it does show that speech input now sits inside a larger platform with its own analytics.
Improving Dictation accuracy and speed
Accuracy improves when you control the recording environment and the structure of your speech. Use a microphone close enough to capture a consistent voice, keep the room quiet, and don't dictate while other people talk over you. In this speech-recognition evaluation, word error rates ranged from 0.087 in controlled dictation to over 50% in conversational or multi-speaker recordings.
That range is why a long, improvised meeting conversation is a poor test of Mac Dictation. Short, single-speaker passages with deliberate correction are more predictable. Speak at a steady pace, pause briefly at sentence boundaries, and say punctuation aloud instead of hoping the system infers your structure.
Build clean speech habits
Use commands such as "period," "comma," "new line," and "caps on." If a command produces unexpected text, test it in a simple editor and adjust your phrasing. Dictation is literal enough that spoken punctuation is still one of the easiest ways to improve output straight away.
Microphone technique matters as much. A laptop microphone works in a quiet room, but an external microphone in a consistent position picks up less room sound and keyboard noise. The differences between microphone types and placements are covered in this guide to microphones for dictation.
Keep a list of recurring names, product terms, and specialist vocabulary. macOS may still mishear uncommon jargon, so note the terms it gets wrong and test them in isolation. For longer passages, dictate in coherent chunks rather than one uninterrupted stream. Review as you go, because fixing a wrong name straight away is easier than finding it later in a long draft.
A controlled macOS dictation benchmark reported that an optimized setup cut the average completion time for a 200-word passage from 82.3 seconds to 42.1 seconds, while word error rate fell from 12.7% to 6.1% and edits per 100 words dropped from 18.4 to 5.3. The lesson is broader than the benchmark. Hotkey-triggered capture, cleanup, formatting, and vocabulary correction work better together than raw transcription alone.
When built-in Dictation falls short
Apple Dictation is usually enough for short replies, notes, and low-risk text where a literal transcript is fine. It gets less comfortable when your spoken draft contains filler words, mid-sentence corrections, formatting instructions, or app-specific conventions. It puts speech into the active text field, but it doesn't turn a rough thought into finished prose.
The most common gap is between what you said and what you meant to keep. If you dictate, "I think, let's move the launch to Thursday," native Dictation may keep the hesitation and the correction. You still have to delete the discarded wording, repair punctuation, and check that the text landed in the right app.
Compare the workflow, not the transcript
A third-party tool earns its place by cutting the editing you do after capture, not by recognizing one isolated sentence. Look for:
- Capture control. A hold-to-talk or toggle shortcut that starts quickly and stops predictably.
- Cleanup. Filler removal, self-correction handling, punctuation repair, and formatting.
- Insertion behavior. Text that reaches the app where the cursor already sits, with sensible handling for editors and terminals.
- Privacy clarity. A precise explanation of where audio is processed and whether transcripts are retained.
- Reviewability. A visible change history or diff when cleanup modifies your words.
Vibe Typer is one option. Its macOS app uses hotkey recording, Magic Formatter cleanup, custom vocabulary, automatic per-app text insertion, and in-memory audio processing with no server-side transcript storage. It has a diff view for reviewing changes and supports 99 languages, with optional automatic language detection. Those cover the gaps native Dictation doesn't try to fill.
The trade-off is more software, more permissions, and another privacy policy to read. A third-party app has its own processing model too, so don't assume every alternative is local or that every cleanup feature behaves the same way. Start with a low-risk note, compare the final text with Apple Dictation, and keep whichever reduces correction without flattening your voice. See this comparison of a Mac dictation app before changing your setup.
App-specific Dictation tips for macOS
The active app changes what "good insertion" means. macOS Dictation can enter text into a focused field, but Mail, Notes, Slack, and terminal editors treat line breaks, punctuation, formatting, and focus differently. Before judging accuracy, confirm the cursor is in the intended field and that the app hasn't moved focus to a subject line, search box, or command prompt.
Mail and Notes need different cleanup
In Mail, put the cursor in the message body before starting Dictation. Say paragraph breaks deliberately, and pause before names, addresses, and subject-specific details. Mail handles punctuation well enough for short messages, but a long dictated email usually needs a manual pass for paragraph structure and tone.
In Notes, Dictation is good for quick capture because the app tolerates rough text. Say "new line" between tasks or ideas, then tidy the note once the full thought is down. Notes is a better first destination than a polished document when you're speaking in fragments and don't want to stop.
Slack favors short, deliberate messages
Slack is less forgiving when formatting matters. Dictate one complete message at a time, and check mentions, links, code-like terms, and line breaks before sending. Don't assume that saying "bold this" will produce the formatting you want in every compose field. For messages that matter, dictate the draft, then apply Slack formatting by hand.
Terminals and editors require plain text
Terminal windows, code editors, and command-line interfaces need care. Dictate natural-language prompts or comments, but check symbols, capitalization, file names, and paths before running anything. A speech system can produce readable prose and still get a technical identifier wrong.
In editors, keep insertion plain unless the app explicitly supports richer formatting. A tool with automatic insertion can adapt its output for editors, terminals, and chat windows, with per-app overrides for when the default is wrong. Whatever the tool, treat dictated commands as drafts until you've checked them by eye.
Your Mac Dictation checklist
Use this list when you set up a new Mac or troubleshoot a setup that feels unreliable.
- Set the trigger first. Open System Settings, Keyboard, Dictation, enable the feature, and replace the default shortcut if it slows you down.
- Review privacy choices. Check the Dictation settings, look at Improve Siri & Dictation, and confirm that your Mac's processing path suits the information you plan to dictate.
- Match language and region. Add the languages you use, then practice switching from the language indicator rather than changing settings mid-message.
- Test the microphone. Record a short passage in a quiet room, then repeat it from your usual desk position. If recognition changes sharply, fix microphone distance and background noise before changing apps.
- Create a correction list. Write down names, product terms, and jargon that macOS keeps missing. Use it for targeted practice and post-dictation review.
- Check each destination app. Test Mail, Notes, Slack, and your editor or terminal separately. Check line breaks, punctuation, formatting, and where the text lands.
- Know when to look at another tool. Consider a third-party option if you need automatic cleanup, custom style instructions, per-app insertion, a visible diff, longer rough-draft capture, or a different processing boundary.
Apple's speech platform has grown from one Dictation switch into Dictation, Voice Control, and per-app speech features. The setup is still personal. The right shortcut, language, microphone, privacy configuration, and insertion behavior matter more than picking a feature because it shipped with macOS.
Vibe Typer adds hotkey voice typing for macOS, with cleanup, custom vocabulary, automatic per-app insertion, and in-memory audio processing with no server-side transcript storage. To compare it with native Mac Dictation, visit Vibe Typer and test it on the apps and languages you use every day.
Try Vibe Typer free
Voice typing that works in every app on Linux, Windows, and macOS. Free to download: 2,000 words a month, no card.
Download free